


Making hot-air balloons
Small, well-formed, flyable hot-air balloons can be made by hand.
Instruction and tipps how to build and fly model hot-air balloons
|
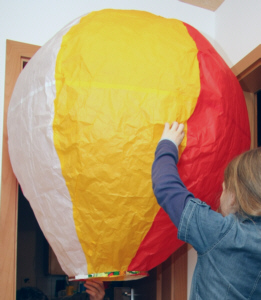
Here you find a description how to build a 115 cm high hot air balloon. This size is practical: it can be build using low cost material, it is not to large to handle and lift off easily, but large enough to fly well. If you prefer building a larger balloon, you can scale up the given measures. If you want to build a balloon with different shape, this file (in German) for calculating other balloon shapes will help. Material and tools needed
|
|

Work steps
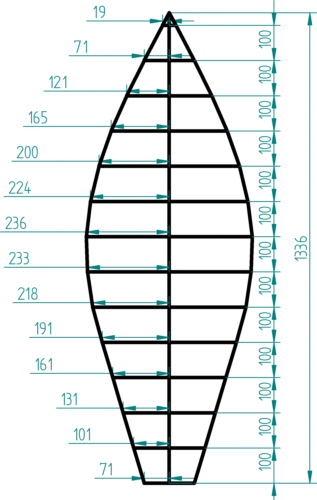
- On the sheet of stiff paper you draw the pattern shown above in a size of 472 mm width and 1336 mm length and cut it. All measures are in millimetres. This sheet can be glued together form smaller parts.
- Make six sheets of the twelve by glueing the tissue papers together in pairs at their small side using the glue stick. The overlap is 15 to 20 mm.
- Copy the pattern to the six sheets of tissue paper. You can cut some sheets together after fixing them together with needles.
- Cut the six sheets in a way, that additional 15 to 20 mm frame remains for glueing later.
- Put glue to the edges of two sheets and stick them together, beginning at the tip. It is easier if one sheet is put on the floor and the second is held up by a second person to prevent premature unwanted glueing. If glue is applied to 40 cm of the edge, then 35 cm are stick together and then the next 40 cm are done, the risk of unwanted glueing is reduced. Avoid holes: later the hot air will pass through! At last the last sheets edge has to be glued to the first sheet. This step is a bit tricky.
- At the bottom a stiff ring formed of cardboard (about 30 mm high and 90 cm long) is glued to the edge of the balloon to keep the fier opening open. The ends of the cardboard ring must overlap: if not the balloon will torn.
- Fold a funnel shaped aluminium dish (about 100 mm diameter; see sketch above). Alternativly you can use an aluminum beverage can: cut away the top, make some larger holes in the side walls as air inlet and small holes near the top to fix the can.
- Pierce three small holes into the cardboard ring. Fix the aluminium dish with three thin wires at the cardboard ring. The dish should be fixed about 10 cm below the lower edge of the balloon.
Lifting off
In many areas there are restrictions concerning flying a hot air balloons (also called "sky lanterns"). In some places you need an advance permission of local authorities to fly such a toy hot air balloon. The author of this text is not responsible for any damage or other trouble potentially caused by building or flying a hot air balloon.
A hot air balloon shoud be tested when it is cold outside and only when there is no risk of forsts to burn. A distance of at least 20 m should be kept to houses or trees to avoid the baloon to be caught by such obstacles. It should be nearly windless for a successful lift-off. Even slight wind will tilt and compress the balloon, so the hot air will be lost. With four persons the lift-off is most easy to handle. Two persons hold the balloon. The third person pre-heats the balloon at best with a blowlamp (without denaturated alcohol in the aluminium dish!). When the balloon inflates, the blowlamp is removed and extinguished. The fourth person has soaked the cotton wool with the denaturated alcohol in a distance to the balloon. Then the cotton wool is put into the aluminium dish (no fire lit at that moment!). Now the cotton wool is lit with a pocket lighter (best is one of those with a long nozzle). Alternatively charcoal lighters can be used. Denaturated alcohol has the advantage that it extinguishes in case the balloon catches fire in the air. The blowlamp is not neccessary, but heats faster. When the balloon pulls up, the two persons holding the ballon let it go at the same time, so the balloon will not tilt. If the balloon catches fire keep distance and let it burn. You can follow the balloon with bicycles if you want. The fire will extinguish after minutes, but the balloon might fly for some kilometres, even if it seems to be windless.
If you made a hot air balloon using this instruction, I would be interessted in a feedback (email adress see impressum).
Annotation:
|
|
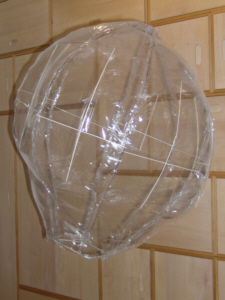
This hot air balloon was an experiment to make very small balloon from clingfilm. The film weighs about 10 g/m2 and is not easy to handle. Fine crosses from balsa wood glued to the clingfilm where neccessary to make the construction possible. The height was about 50 cm, to small to carry a flame. After heating with a blowlamp the balloon went straight up to the ceilling, paused for seconds and sank down very fast. The small air volume enclosed looses – also via infrared iradiation – temperature very fast. So larger hot air balloons do not only carry larger weights, because their volume is larger. Also their 'surface to volume'-ratio is smaller, reducing the portion of the weight of the wrapping and the amount of heat lost via infrared light. It is difficult to make a balloon with less than 1 m height carrying its flame. |
Making bellows
Bellows are used to connect objectiv lenses with a camera or to case moving parts of machines. Bellows protect the inside from dirt, gases or light coming from outside or they protect the outside from moving parts or chemicals from the inside. Bellows have diferent cross sections and length and are made from various materials. Here you find instructions how to make bellows from tough paper or light cardboard usable with cameras. The bellows described here are made from a single sheet of paper. When sewing or glueing multiple sheets together, other crease geometries become feasable. Bellows made of rubber might have nearly any user-defined geometry.
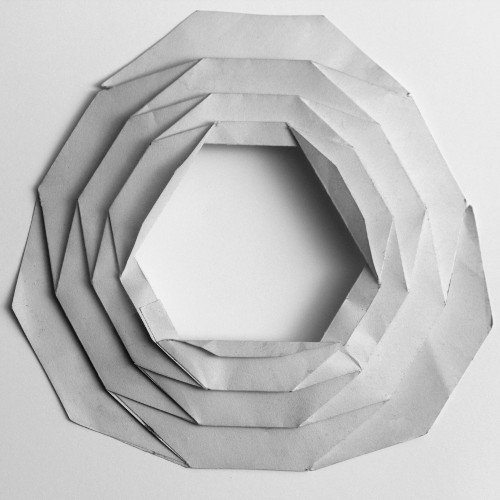
You should make tests with cheap paper before making long bellows from expensive material. The first figure shows a semi-finished bellows made of thin though black paper.
Bellows with square cross section

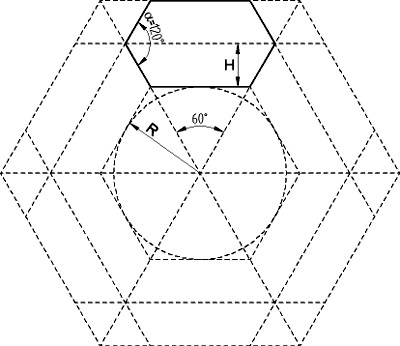
First I describe making bellows with square cross section. The following sketch is needed to correctly cut the paper for the bellows:
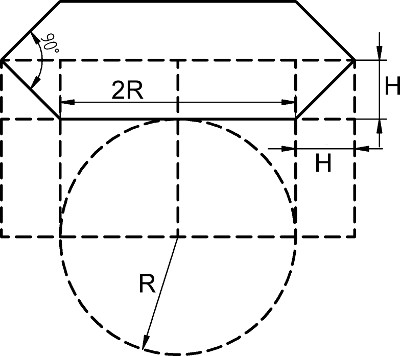
In this example the bellows will have a square cross section with an inner edge length of 2R. Using the sketch above the sexangle limited by a solid line. The height H gives the maximum outer diameter 2R+2H of the bellows. When H is large, less creases are needed to reach the required length of the bellows, but also the outer diameter becomes larger. As more creases are more work to realize, a height H of about 10 to 20 mm in most cases is a good choice. In relation to the bellows cross section a value of about H=R/2 or H=R/3 might also be a good choice.
In the next step this sexangle is replicated as shown in the next sketch and copied to the paper of the future bellows:
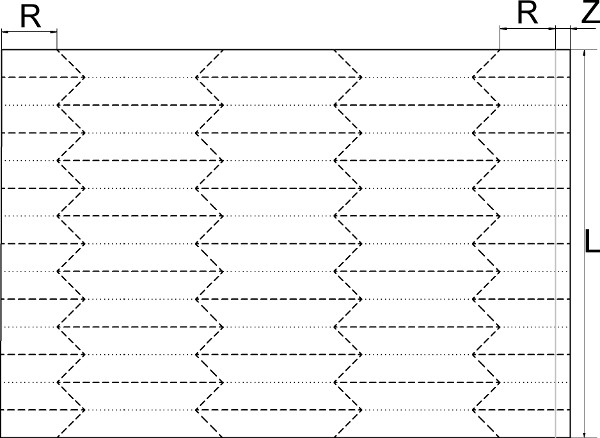
To make a bellows of a maximum total length G, the length L of the paper is at least L=2G. The paper creases will be strained less when a larger length, for example L=2,5G is chosen.The minimum total length of the compressed bellows is at least 1.2*paper length*2*L/H, that is about 5*paper length*G/H.The length Z is the overlap needed to glue the bellows. It should be in the range of 5 to 10 mm, depending on the fabrication tolerance. In the sketch dashed lines mark edges folded to the outside of the finished bellows. Dotted lines mark edges pointing to the inside of the finished bellows. All lines are grooved with ruler and folding stick. Then the sheet of paper is rolled to form a tube and the edges are glued with an overlap Z. Beginning at one side of the tube the creases are folded one after the other. The first creases are more difficult than the following.
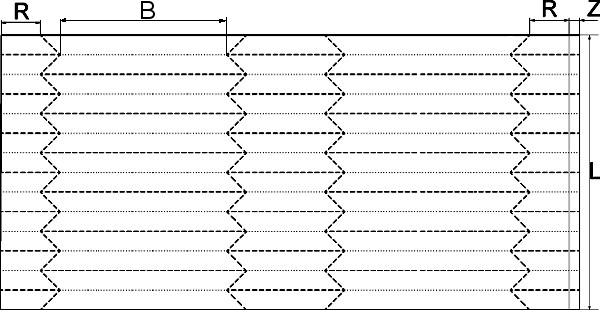
For bellows with an inner rectangular cross section of 2R·B, there are short and long sexangles in the sketch:
Bellows with hexagonal cross section
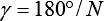
For bellows with for example a hexagonal cross section the angle α in the first basic sketch is changed from 90° to 120°. The angle α is calculated as α=180°-360°/N, with N=6 for a hexagonal cross section. Bellows with odd numbers N ar not possible, as in this case when glueing the tube a crease pointing to the inside will meet a crease pointing to the outside. This could be equaled by a shifted glueing, resulting in a screw-shaped bellows strongly limited in the changing of the total length. Additionally both ends of such a bellows would rotate slightly when changing the bellows length.

Conical bellows
When the cross section of a bellows should not be constant, the sketch for the paper blank becomes more complex. The height H now changes from one side of the bellows to the other. As an example a bellows with hexagonal cross section is construced here. The bellows has only a few creases for the sake of clarity.
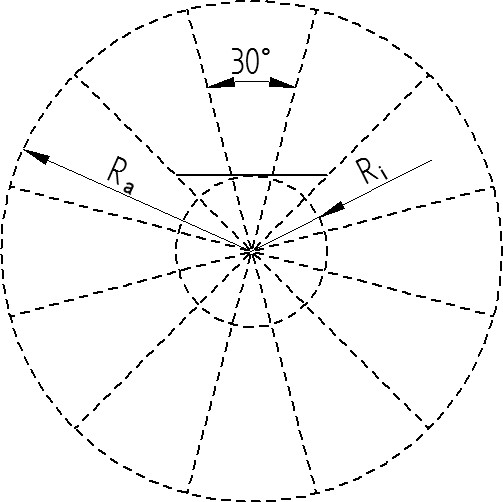
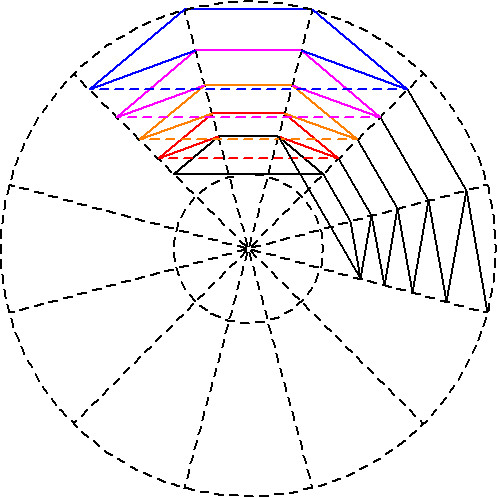
First we draw two concentric circles with radii Ri und Ra, where Ri is half of the inner diameter of the narrow side of the bellows and Ra the inner radius of the wide side of the bellows.These circles are divided in 30°-steps (i.e. 360°/2/N) as shown in the sketch below. A horizontal tangent is drawn on the top side of the inner circle:
Next several lines are drawn corresponding the sketch below, until the outer diameter is reached:
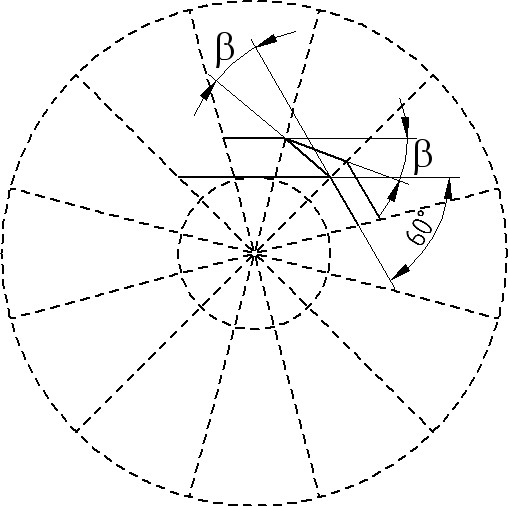
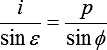
The 60°-angle is choosen as 360°/N (here: N=6).The choice of angle β defines the total number of creases and consequently the maximum total length of the bellows. The correct value of angle β is calculated below as the calculation will be more easy to understand after the construction has been described. There are only four directions of parallel lines added in the sketch below:
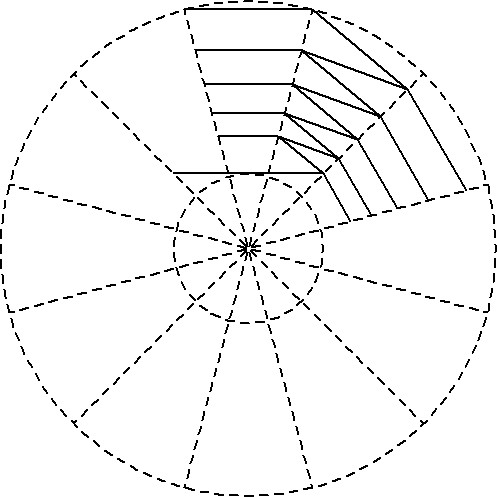
By mirroring along two auxiliary lines (here marked pink) the diagonal zigzag line is copied twice:
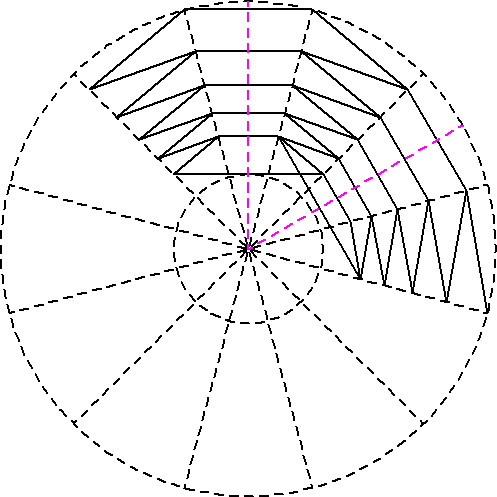
In a next step the areas marked in different colours in the next sketch are copied to another sheet of paper:
Now the lines in the areas of different colour are mirrored along the bottom line and the sexangle generated in this way are shifted together:
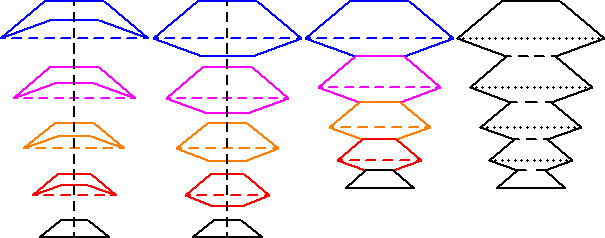
Similarly the areas coloured in blue and green below in the next sketch are processed:

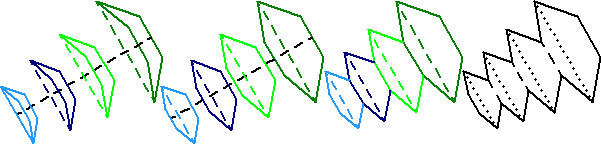
Then the areas surrounded by black solid lines in the drawings above are positionend next to each other:

Dashed lines again mark creases pointing to the outside of the bellows, dotted lines point to the inside. This surface is arranged three times (so N/2 times) in the way shown below. At one side an overlap for glueing is added.

All lines are grooved with ruler and folding stick. Then the sheet of paper is rolled to a conic tube and the edges are glued with an overlap. Beginning at the narrower side of the tube the creases are folded one after the other. The first creases are more difficult than the following.
Now the question how to choose the angle β to get a bellows with the wanted maximum total length has to be answered. Some calculations are neccessary to answer the question. If you are only interessted in the result, you can jump to the last passages and tables of this text.
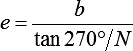
The maximum total length of a conical bellows according to experience is about a third of the total paper length L. The length L is the sum of the heigth of all single creases. The height of the single creases increases from the the inner to the outer circle and depends on the angle β. To calculate this heigth subsequently lengths in the light blue, then in the shaded and finally in the yellow triangle are calculated:
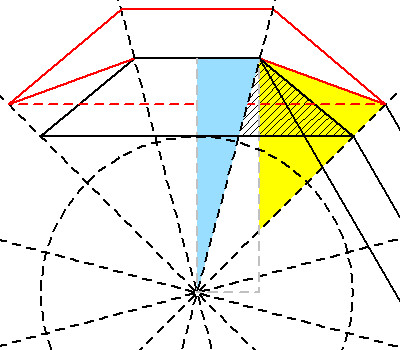
In the following sketch the distances are named:
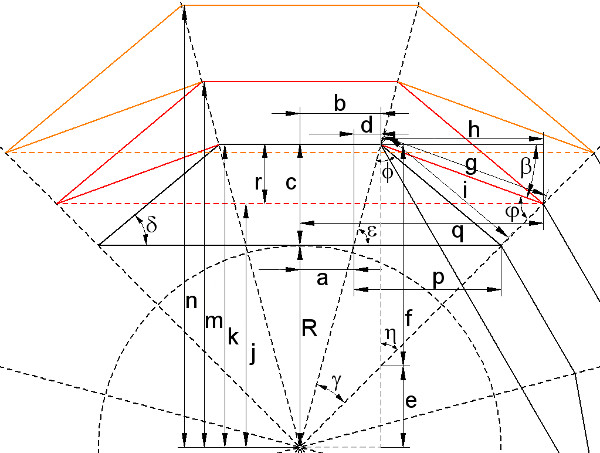
Bellow R is used instead of Ri. With the angles
 ,
,  ,
,  ,
,  ,
, 
and the distances


 ,
, 
 ,
, 
 ,
,  ,
, 

follows for k:

and for j:

As neighbour creases are geometrical similar, the ratio of the edge length of a creases to the edge length of the next inner crease is:

For the same reason the next outer creases edge lengths are related via:


So the required paper lenght for the ith crease of the bellows is:
The total paper length is:

with the number of creases M. For bellows with clearly different diameters at both sides, the maximum total length of the bellows is about one third of the totel paper length L.
Short instruction to calculate the angle β
If you want to make a conical bellows, you start by defining the smaller inner radius R and the larger inner radius Ra , the number N (N=4 for square cross section, N=6 for hexagonal cross section) and the maximum maximum total length G. The total paper length you need will then be about 3G. The number of creases M fixes the maximum total length of the bellows and is determined by the angle β. A clue for a good choice of angle β is given in the tables below. The values for β are always in the range of 360°/N and 180°/N. If it is not important to realize the bellows with a low number of creases, the number of creases M should be chosen in a way, the angle β becomes large. Small angles β<10° result in bellows with short maximum total length. For β=0 no useful layout results: the bellows degenerates to a flat piece of paper. To mimimize the outer diameter of the bellows the number N and the number of creases M have to be increased.
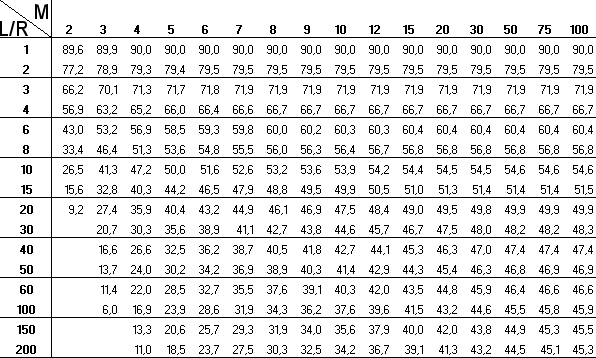
The first table gives values for the angle β for bellows with a square cross section (N=4). Horizontally the number of creases M is listed, vertically the total length L of the paper divided by the smaller inner radius R.
The second table gives values for the angle β for bellows with a hexagonal cross section (N=6). Horizontally the number of creases M is listed, vertically the total length L of the paper divided by the smaller inner radius R.
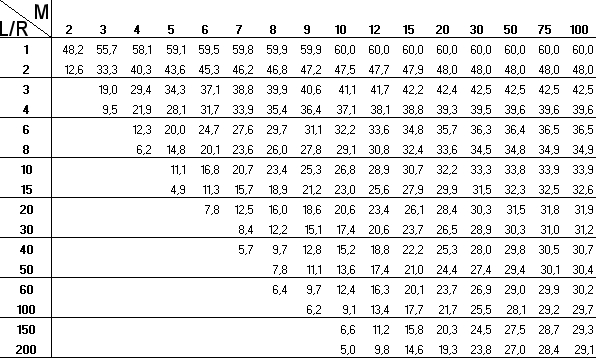
Example: You want to make a conical bellows with hexagonal cross section and end diameters of 60 mm respectively 100 mm and a maximum total length of 80 mm.
So you get N=6, R=30 mm, Ra=50 mm, G=80 mm. The neccessary total paper length is L=3G=240 mm. The value L/R is 8.The number of creases M is chosen as M=10 to get a not to small angle β from the second table. With these values for M and L/R the second table gives β=29.1°. On mouse-over this readout is clarified in the second table  .Using this value for β, the layout is drawn as described above.
If you realized a bellows using this instruction, I would like to hear about (email adress: see impressum).